Creating a new CARA Spectrum Type
Spectrum Types are used in the Object model of CARA to represent the properties of each type of experiment. They are located in the CARA Repository library which is accessible in the CARA explorer under Repository-Spectrum Types. The Spectrum Types define the atom type along each dimension of a type of spectrum (e.g. HNHA). They also define the expected labels along each dimension (SynchroScope and StripScope need this information). Spectrum Type can also be used to represent the magnetization pathway so that CARA can predict the expected peaks for that Spectrum Type in HomoScope, PolyScope, StripScope, SystemScope.
Lets go through a simple example, the HNHA:
- Goto the CARA-explorer and click on Spectrum Types.
- A list of all the Spectrum Types defined in your repository is displayed in the right window.
- Right-click in the right window, and select context menu Add Type
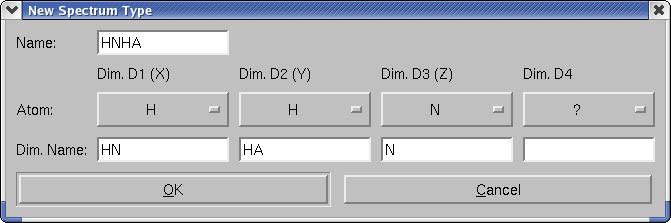
- You will get a New Spectrum Type window which is empty.
- Enter the Spectrum Types name: "HNHA".
- Select the Atom Types for each of the three dimensions.
- For HNHA, HN is along X axis, HA is along Y axis (strip axis), N is along Z axis.
- Enter the Dim.Names you want to appear when you click the cursor in the spectrum.
When you are done, the New Spectrum Type window looks like this:
Now we define the expected labels along the three axes.
- Click on the arrow node next to the Spectrum Type HNHA in the Spectrum Type window.
- The three dimensions with Dim.Names appear.
- Click on the first Dim.D1 and right-click the context menu Add Label. Enter "HN".
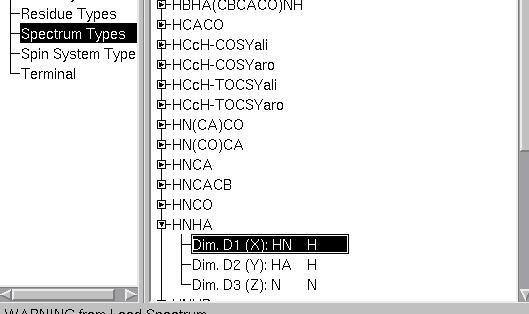
- Repeat the procedure for Dim.D3 and Add Label "N".
Dim.D1 and D3 are the "anchor dimensions" of the experiment. Only one label is allowed in these dimensions.
"HN" and "N" are unique keys. StripScope needs them to know which atoms to use for strip coordinates.
Advanced: It is possible to work without unique keys. StripScope will then combine all spins which can be connected based on the defined generic residue type and the atom types of the two dimensions D1 and D3. (E.g. if the generic residue connects HA to CA, then StripScope will show the strips for spin systems where the CA and HA spins are defined in a 3D 13C-resolved [1H,1H]-NOESY).
- Finally Dim.D2 (the strip dimension) can have many labels. For the HNHA,add four labels:
- HA (for non-GLY)
- QA (for GLY degenerate)
- HA1 (for GLY)
- HA2 (for GLY)
Now your Spectrum Type should look like:
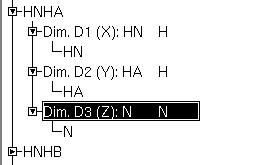
(Except that QA, HA1, and HA2 also appear under Dim.D2)
The Spectrum Type is now sufficient for work with SynchroScope and StripScope.
- Now use Add Spectrum in the CARA Explorer-Spectra window, select "HNHA" as Spectrum Type, and use file browser to select the HNHA spectrum.
- CARA may ask you to define the order of the HN and HA dimensions. It displays the dimension names from the XEASY param files "Dimension ID" if these are defined.
- Check the ppm ranges of the Spectrum by expanding the Spectrum node of the HNHA in the CARA Explorer-Spectrum window. These should match the ranges for each atom.
Example:
- HN 11.80..4.80
- HA 11.80..0.50
- N 130.00..103.70
Finally, check the orientation of the spectrum by opening it with MonoScope. Click in the spectrum. Check the name of the cursor axes and the ppm values in the command line at the bottom of the window.
Experiment Procedure
To use the advanced features of CARA namely the ability to predict peaks based on the Object model, you must define an Experiment Procedure.
We continue with the HNHA as example:
- Right-Click on the Spectrum Type "HNHA" in the CARA Explorer-Spectrum Types window.
- Select the context menu Edit Procedure.
- The Spectrum Type is displayed in the upper pane.
- The magnetization pathway for an HNHA is: HA (f1) -> HN -> N (f2) -> HN (f3)
- In CARA the anchor comes at the start. We are not interested in Out-and-Back steps, so we simplify:
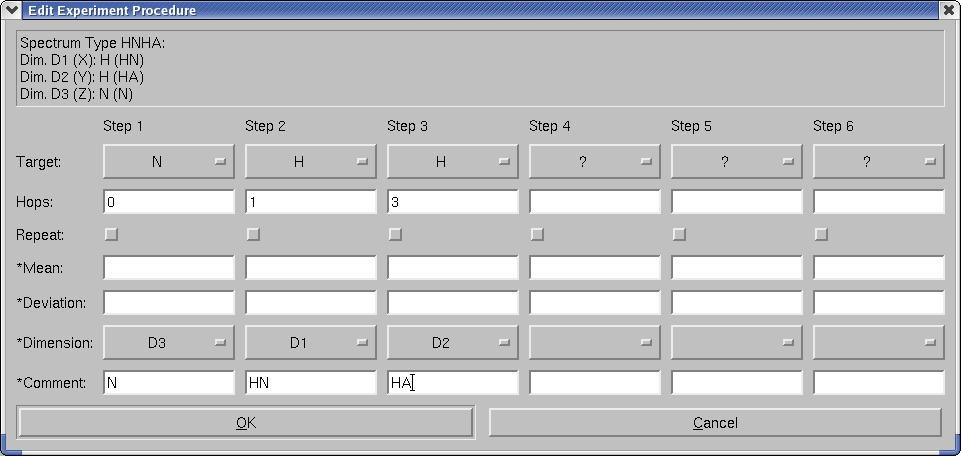
N -> HN -> HA
- Enter the Target Atom Types N -> H -> H on the first line.
- Next we enter the number of bonds separating Source and Target Atoms in each step.
- The first step has no source atom, so the number of bonds (HOPS) is Zero: 0.
- Next we go from N -> HN. Only one bond separates N and HN so HOPS=1.
- Finally, the 3-bond scalar coupling 3J(HNHA) mediates the transfer to HA, so HOPS=3.
- We will come to mean and standard deviation in the next example. They can be left blank for the HNHA.
- The last line defines the orientation of the experiment as displayed by CARA.
- We want the HN dimension along x (this is D1 in CARA).
- The N dimension is the depth (D3 in CARA)
- Finally, HA is the strip axis (D2 in CARA).
Your Experiment Procedure should now look like this:
Finally test the magnetization transfer for the Experiment Procedure.
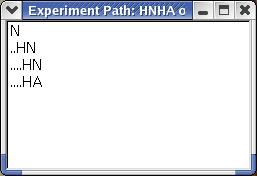
In the "Spectrum Type" pane of CARA explorer, right-click the Spectrum Type "HNHA" and select Show Experiment Path. Select a Residue Type (e.g. ALA)
The pathway is displayed:
Now it should be possible to open the HNHA with PolyScope, SystemScope, StripScope and see the inferred peaks (if you have assigned HN,N & HA for some systems). Also the option Label Peak should give you the correct label options.
CARA will automatically determine the expected labels using the object model.
A more complex example using the chemical shift ranges to limit expected peaks can be found under SpectrumTypeCBHD
BACK: GlobalCursor
NEXT: ResidueType